Pages

Sunday, July 21, 2013

Mexican Hot Chocolate Snickerdoodles (vegan)

I've been making many tasty things in the past few weeks, but I haven't been diligent about taking photos and posting.  Too busy eating, I suppose.  Oops.  My apologies, dear Reader(s)!


However, I do have this recipe for you, and it's great.  A simple cookie that's a twist on a classic, and it just so happens to be vegan.


When you first bite into it, you taste chocolate, "oh, how nice..." and then the creeper cayenne comes in with a bit of heat for a surprise.


After eating a cookie or five two, it dawned on me what the perfect beverage would be to accompany them - horchata!  Luckily, I happened to have some on hand, and the cool, cinnamon-laced rice drink was absolutely wonderful after the depth and kick of the cookies.  I don't have the recipe posted for that quite yet, but I will - promise!


Mexican Hot Chocolate Snickerdoodles
(from Vegan Cookies Invade Your Cookie Jar)
Makes 2 dozen cookies

For the topping:
1/3 cup sugar
1 teaspoon ground cinnamon

For the cookies:
1/2 cup canola oil
1 cup sugar
1/4 cup pure maple syrup
3 tablespoons almond milk (Or your preferred non-dairy milk)
1 teaspoon vanilla extract
1 teaspoon chocolate extract (or more vanilla extract if you have no chocolate)
1 2/3 cups flour
1/2 cup unsweetened cocoa powder
1 teaspoon baking soda
1/4 teaspoon salt
1/2 teaspoon cinnamon
1/2 teaspoon cayenne

Preheat oven to 350 F. Line 2 large baking sheets with parchment paper.

Mix the topping ingredients together on a flat plate. Set aside.

In a medium mixing bowl, use a fork to vigorously mix together oil, sugar, syrup, and milk. Mix in extracts.

Sift in remaining ingredients, stirring as you add them. Once all ingredients are added mix until you’ve got a pliable dough.

Roll dough into walnut sized balls. Pat into the sugar topping to flatten into roughly 2 inch discs. Transfer to baking sheet, sugar side up, at least 2 inches apart (they do spread). This should be easy as the the bottom of the cookies should just stick to your fingers so you can just flip them over onto the baking sheet. Bake for 10 to 12 minutes, they should be a bit spread and crackly on top. Remove from oven and let cool for 5 minutes, then transfer to a cooling rack to cool completely.

Enjoy!

Tuesday, July 16, 2013

Chickpea Sauté with Greek Yogurt

Have you ever encountered a recipe that really is a collection of ingredients you wouldn't think to group together, but end up being an absolutely fantastic dish?


A friend of mine made this for a party and gave me a pre-party taste.  I was a bit wary at first, thinking it would be some fancy-schmancy dish that wasn't my thing... but I was pleasantly surprised.  It was so good!  So good, in fact, that at the party I kept sneaking back to the big platter of it to grab some more and hope no one noticed my four multiple helpings.


When I asked my friend for the recipe I thought it would be a long and complicated recipe.  Nope!  It's super easy and quick, especially with a shortcut with the greens.  It's a fairly healthy dish, and with the addition of some brown rice or quinoa you have yourself a solid meal.


This was my first time cooking with fresh mint, which is apparently only sold in large bunches.  Mojitos, anyone?  It also uses caraway seeds, which gives rye bread its distinctive taste.  The husband dislikes rye bread (odd, in my opinion), so I thought this dish would be a flop for him.  However, he liked it too!


Because of the ease, the amazing flavor, and the healthy ingredients, this will definitely be a staple in our home!

Chickpea Sauté with Greek Yogurt
(from Plenty)
Serves 4+

10-12 oz. Baby kale or green of your choice (swiss chard, etc)
1/3 cup olive oil (which seems a bit extreme, so I cut it back to 1/4 cup or less)
4 medium carrots, peeled and cut into 1/4 inch dice
1 tsp caraway seeds
1 can chickpeas
1 garlic clove, crushed
1 Tbsp fresh mint, chopped
1 Tbsp fresh cilantro, chopped
1 Tbsp lemon juice
Salt and black pepper
1/2 cup Greek yogurt
1 Tbsp olive oil
Prepared quinoa or brown rice (optional)

(The original recipe calls for blanching 3/4 lb. swiss chard and chopping roughly.  Feel free to do that, but I preferred the ease of using baby kale)
**7/22/13 EDIT: I recently made this recipe and blanched a mix of swiss chard (chopped stems and leaves) and kale, as listed in the original recipe, and really enjoyed it that way as well!

Heat up the olive oil in a large saucepan.  Add the carrots and caraway seeds and sauté for 5 minutes on medium heat.  Add the greens and the chickpeas, cover, and cook for roughly 6 minutes, or until the greens are wilted.  Now add the garlic, herbs, lemon juice, and some salt and pepper.  Remove from the heat and cool down a little.  Taste and adjust the seasoning.

To serve, mix together the yogurt, olive oil and some salt and pepper.  If using a cooked grain, spoon grain into bowl.  Pile the vegetables on the grain and spoon the yogurt on top.

Enjoy!

Thursday, July 4, 2013

Blueberry Yogurt Multigrain Pancakes

How about a little patriotism for breakfast?


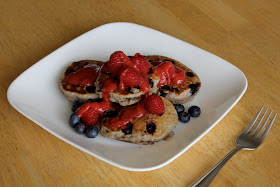
We've made these before, but they weren't the most photogenic.  Mostly because I used our super fancy stainless steel pan (that is still beyond us, apparently) and even with a bunch of butter they burned and stuck pretty badly.  So, today we went with good ole non-stick and coconut oil.  And the results were lovely.  And YUMMY.


To top them off I pureed some strawberries, added a bit of agave nectar and lemon juice and reduced it on the stove.  It made a great syrup that was tasty, wasn't too sugary and complimented the theme of the day.  ;-)


Usually when I eat pancakes I end up leaving the table feeling full and icky from all the sugar and then being hungry 2 hours later.  These are the perfect answer for the desire for pancakes without that gross feeling.  Make and eat without regret!

'Murica!  Happy Independence Day!

Blueberry Yogurt Multigrain Pancakes
(from Smitten Kitchen)
Makes ~ dozen pancakes

2 large eggs
1 cup plain, full-fat yogurt (we used Noosa)
2 to 4 Tbsp milk
3 tablespoons butter, plus extra for buttering skillet (or use coconut oil for the skillet)
1/2 teaspoon lemon zest
1/2 teaspoon vanilla extract
1/2 cup (62 grams) whole wheat flour
1/2 cup (68 grams) all-purpose flour
1/4 cup (32 grams) barley or rye flour
2 tablespoons sugar
1 tablespoons plus 1 teaspoons baking powder
1/2 teaspoon table salt
1 cup blueberries, rinsed and dried

Melt half of butter. Remove from heat and stir in second tablespoon of butter until melted. This keeps your butter from being too hot when you next want to add it to the wet ingredients.

Whisk egg and yogurt together in the bottom of a medium/large bowl. If you’re using a thin yogurt, no need to add any milk. If you’re using regular yogurt, stir in 2 tablespoons milk. If you’re using a thick/strained or Greek-style yogurt, add 3 to 4 tablespoons milk. Whisk in melted butter, zest and vanilla extract. In a separate, small bowl, combine flours, sugar, baking powder and salt. Stir dry ingredients into wet only until dry ingredients are moistened. A few remaining lumps is fine.

Preheat your oven to 200°F and have a baking sheet ready (to keep pancakes warm). Heat your skillet or saute pan to medium-low.  (Always better to start lower to avoid the burnt first batch!)  Melt a pat of butter or coconut oil in the bottom and ladle a scant 1/4 cup (about 3 tablespoons) batter at a time, leaving at space between each pancake. Press a few berries into the top of each pancake. The batter is on the thick side, so you will want to use your spoon or spatula to gently nudge it flat, or you may find that pressing down on the berries does enough to spread the batter. When the pancakes are dry around the edges and you can see bubbles forming on the top, about 3 to 4 minutes, flip them and cook for another 3 minutes, until golden underneath. (If you listen closely, after a minute you’ll hear you blueberries pop and sizzle deliciously against the pan.) If pancakes begin cooking too quickly, lower the heat. Transfer pancakes to warm oven as they are done cooking, where you can leave them there until you’re ready to serve them.  Serve with your favorite fixings (a fruit syrup or maple syrup is great!)

Enjoy!