Wednesday, December 25, 2013

Gingerbread Waffles

This Christmas  morning I decided to try a festive breakfast - gingerbread waffles.  The husband loves gingerbread, so I figured he wouldn't mind a deviation from a cold bowl of cereal for breakfast.


The kitchen smelled amazing while these were cooking!  The original recipe makes 16 waffles, which is far too many for us, so I halved the recipe.  But if you're cooking for a crowd, definitely make a full batch.


These are the perfect way to start Christmas (although I'm sure they're just as good any old day.)  Now, do you think it's too early for mulled wine...?


Happy holidays everyone!


Gingerbread Waffles
(from Food Network)
Makes 8 waffles

1 1/2 cups all-purpose flour
2 tsp baking powder
1 tsp ground cinnamon
1 tsp ground ginger
1/4 tsp nutmeg
1/4 teaspoon salt
2 large eggs
1/3 cup packed dark brown sugar
1/2 cup canned pumpkin puree
1/2 cup + 2 Tbsp milk
1/4 cup molasses
1/4 cup (1/2 stick) melted butter, plus some to butter the iron (if necessary)

Preheat waffle iron.

In a large bowl combine flour, baking powder, cinnamon, ginger, nutmeg and salt. In a medium bowl, beat eggs and brown sugar until fluffy, then beat in pumpkin, milk, molasses and melted butter. Stir the wet into dry until just moist. Do not overstir the waffle batter.  If necessary (it's not on my iron), brush the iron with a little melted butter.  Pour a heaping 1/3 cup into hot, greased waffle maker and cook by your wafflemaker's instructions.  Keep warm and crispy on a cooling rack-cookie sheet in a 250 degree oven until ready to eat.
 
Serve with toppings of choice (butter and maple syrup were perfect for us.)
 
Enjoy!

Friday, December 6, 2013

Overnight Crockpot Carrot Cake Porridge

Imagine a chilly and frosty morning, and you don't want to get out of bed.  But then you catch the warm scent of cinnamon and spices wafting from your kitchen.  So you get up, and there is a crockpot full of warm and cozy porridge, ready to be eaten.  Sounds amazing, right?


I've been making overnight crockpot oatmeal for months now, and it's been fantastic.  A healthy, warm, and cheap breakfast ready for you when you wake up - what more could you want?  Mostly it's been an apple-cinnamon variety, but we've also tried peach-blueberry, strawberry-banana, and pumpkin pie.  I'll have to share the other versions as well because they are all delightful.


This flavor was inspired from a favorite blog of mine, Oh She Glows.  Sneaking vegetables into breakfast, but it tastes like a dessert?  Win-win.  You may be asking what makes this a "porridge."  Well, porridge is defined as "a dish consisting of oatmeal or another meal or cereal boiled in water or milk."  So, we'll go with that.


The perfect winter breakfast!

Overnight Crockpot Carrot Cake Porridge
(inspired by Oh She Glows)
Makes 4-6 servings

1/2 cup steel-cut oats
1/2 cup short-grain brown rice
1/4 cup pearled barley
1/4 cup whole oat groats (I get these in a bulk bin at Whole Foods, but if you can't find them, just add more steel-cut oats)
3 cups shredded carrot
2 tsp cinnamon
1/2 tsp ginger
1/4 tsp nutmeg
Pinch of salt
2 tsp vanilla extract
1/4 cup brown sugar
6 cups water

To top off:
Milk of choice (I used coconut, but regular/soy/almond would work too)
Chopped walnuts or pecans
Raisins
Brown sugar/maple syrup to taste

Before going to bed, prepare your porridge.  Place a Slow Cooker Liner in your crockpot (Reynolds makes them, by the Ziploc bags).  If you don't want to spend an eternity scrubbing your crockpot - use one of these!  Trust me.  They're amazing.

In your lined crockpot, pour in your steel-cut oats, brown rice, barley, groats, carrot, cinnamon, ginger, nutmeg, salt, vanilla, brown sugar and water.  Stir.  Cover and set your crockpot to low and cook overnight.

In the morning, stir the porridge, and add in at least 1/2 cup raisins.  Top off your bowl with milk of choice, chopped nuts and sweetener.  Enjoy!

Sunday, October 27, 2013

Berry Almond Oatmeal Kale Granola

Stay with me!  I know this sounds weird...or gross...or unappealing.  It's not - it's awesome.  Let me explain.  Regular granola is great, but isn't it such a disappointment at how unhealthy it really is?  High calorie and so fatty, ugh.  When I stumbled upon this recipe from Eating Bird Food, I just had to give it a shot.  Plus, I love to try out unusual flavor combinations.  For example, when I gave our Executive Director  THIS cupcake without telling him what flavor it was he said, "Knowing you, it's something weird, but good."


If calling this 'granola' is too much to wrap your head around, just think of it as sweet kale chips!  Now kale has a pretty distinct bitter flavor, but the preparation really cuts through that and makes a light, crispy, sweet, cinnamon-y treat.  The original recipe calls for a dehydrator, but since I do not have one, I'm extremely grateful that the author of Eating Bird Food figured out how to bake them in the oven.


It's quite clever how a paste of dates and mango (two of the sweetest fruits to combat kale's bitterness) with cinnamon is then rubbed into the leaves and transforms this hearty leaf to a crispy and sweet treat.  Add in your favorite dried fruit (I used craisins and cherries) and sliced almonds.  The original recipe also called for shredded coconut, but I cut that out since I don't really care for it.  After my first batch, I thought it would be nice to make it a bit more granola-like, so at a friend's suggestion I added oatmeal.


You're still not sold.  Okay, imagine a warm, cinnamon-y scent wafting through your kitchen.  Smells great, right?  (Yes, there are a multitude of other ways to accomplish this - apple pie, zucchini bread, cinnamon rolls, etc, but this one won't leave you feeling lethargic and sugar-blasted.  And it's really tasty.)


Almost everyone that I gave a sample to liked it (and even the husband was snatching a few off the cookie sheet).  In addition to snacking on it dry, I'd also like to note that it's quite good on yogurt, just like regular granola.  It's a fun way to get your greens, so be daring and give it a try!

Berry Almond Oatmeal Kale Granola
(Adapted from Eating Bird Food)

1 large bunch of kale, washed, dried, de-stemmed and torn into bite-size pieces
5-6 pitted medjool dates (I used fresh because they were available, but dried is okay too)
½ cup fresh or frozen mango (thawed), chopped into chunks
1 teaspoon cinnamon
½ teaspoon sea salt
½ cup dried cherries, blueberries or cranberries
½ cup sliced almonds
½ cup oatmeal (I used 1 minute oats, just because they're smaller and this is such a light and crispy snack, but rolled oats would be fine)
  1. In a medium bowl, soak the dates in ½ cup water for at least 30 minutes, or until softened.
  2. Make sure your kale is as dry as you can get it. Then place it in a large bowl.
  3. In a food processor, chopper or high powered blender, combine the soaked dates + 1 tablespoon of soaking liquid and fresh mango. Blend until it is a thick paste. Add the cinnamon and salt and blend briefly to combine.
  4. Add paste to kale leaves and massage with your hands to coat each leaf, until all leaves are coated
  5. Add in the dried berries, almonds and oatmeal and mix well so these items get coated as well.
  6. Pre-heat your oven to 300°, spread kale into a thin layer on two cookie sheets lined with parchment paper.  Bake for roughly 30 - 40 minutes with the oven door slightly ajar (a wooden spoon wedged in the oven door works perfectly for this). Maybe sure to watch at the 30 minute mark gets close so that the kale doesn’t start to burn.  Spread and flip the kale, if needed, to completely dry it out.  You want it light and crispy, but not scorched.
  7. Once cooled, store in an airtight container.
Enjoy!

Saturday, October 12, 2013

Cowboy Cookies (Vegan)

I never tire of trying out new cookie recipes, and after a few trials this one has become a favorite of mine.  It's easy, quick, and tastes great.  Particularly straight from the mixing bowl.  Seriously, I could just sit down with a bowl of this and be perfectly content.


You might have noticed that I reference quite a few cookbooks from this same author - Isa Chandra Moskowitz.  I love her stuff.  It seems to just get better and better with each new cookbook.  And you certainly do not have to be vegan to enjoy her recipes! 

Who's got two thumbs and is psyched for Isa's new book coming out in a few weeks?  THIS GIRL.  Anyway, it's not really relevant to this post, but I thought I'd share the good news.  Now back to your regularly scheduled, drool-worthy cookies...


This recipe originally was one of those I thought to whip up on a Friday right before work.  And it's so easy that it was no problem.  I fiddled with the original recipe a bit - swapping out half the oil for unsweetened applesauce, and also swapping out part of the flour for whole wheat flour.  It wasn't because the recipe needed tweaking, but mostly so I felt less guilty about eating a spoonful....or five.


These are husband and coworker approved!

Cowboy Cookies (Vegan)
(Slightly adapted from Vegan Cookies Invade Your Cookie Jar)
Makes 2-3 dozen, depending how large you make them

2 cups quick-cooking oats
1 1/2 cups all-purpose flour
1/2 cup whole wheat flour
1 tsp baking soda
1/2 tsp baking powder
1/2 tsp salt
1/3 cup canola oil
1/3 cup unsweetened applesauce
2/3 cup granulated sugar
3/4 cup firmly packed brown sugar
1/2 cup nondairy milk
1 Tbsp ground flax seeds
1 tsp vanilla extract
1/2 cup (heaping) semi-sweet chocolate chips
1/2 cup (heaping) dark chocolate chips
1 cup chopped walnuts or pecans (I used walnuts)
1/4 cup (or more to your taste) cocoa nibs
***You may change the additions, of course!  Other nuts, shredded coconut, raisins, craisins, etc are other popular additions.

Preheat oven to 350 degrees.  Line two baking sheets with parchment paper.

In a medium-size bowl, stir together oats, flour, baking soda, baking powder, and salt.  Set aside.

In a large bowl, beat together oil, applesauce, both sugars, nondairy milk, flax seeds, and vanilla.  Fold in half of the flour mixture to moisten, then fold in the remaining half.  Just before the mixture is completely combined, fold in the chocolate chips, nuts, and cocoa nibs.

For each cookie, drop 2-3 Tbsp size ball of dough (slightly smaller than a golf ball) onto the paper lined cookie sheets.  The dough will be sticky and thick, and you won't be able to roll it in your hands.  (Or if you do, it'll be a mess, and you'll just have to lick all of it off your hands.  Oops.)  Leave about 2 inches of space between each cookie.  Flatten slightly with moistened fingers.

Bake for 14-16 minutes until edges start to brown, then remove from oven.  Let the cookies rest on the baking sheet for 5 minutes, then transfer to wire racks to complete cooling.  Store in a loosely covered container.

Enjoy!

Wednesday, September 25, 2013

Grandma's Zucchini Bread

This is the time of year when everyone seems to have an inordinate amount of zucchini squash.  And you're forcing it on friends and family, or sneakily leaving it at work for coworkers.  "Please take some!"  There are lots of savory applications for zucchini, of course, but this classic baked good brings me back to my childhood in a wonderfully nostalgic way.


My grandma had a garden, and therefore ended up with LOTS of zucchini.  Each year she would make this bread and I would swipe as many pieces as possible.  It's a very straightforward Midwestern recipe that everyone can enjoy.


It also freezes VERY well, so feel free to bake many loaves and freeze a couple for the winter when you really are craving anything with produce in it.


Zucchini Bread
(My grandma's recipe!)
Makes 2 loaves

3 eggs, beaten
1 c. oil  (you can substitute half with unsweetened applesauce if you're trying to be a bit healthier)
2 c. sugar
2 c. grated zucchini
1 tsp vanilla extract
3 c. all-purpose flour
1 tsp baking powder
1 tsp salt
1 tsp baking soda
1 Tbsp cinnamon
1 c. walnuts, chopped

Preheat oven to 350 degrees.  In a large bowl, mix together the eggs, oil, and sugar first, and then add in the zucchini.  Then mix in the flour, baking powder, salt, baking soda, cinnamon and fold in the walnuts.  Line 2 loaf pans with parchment paper.  Bake at 350 degrees about 1 hour, until a toothpick comes out clean.

Enjoy!

Sunday, September 15, 2013

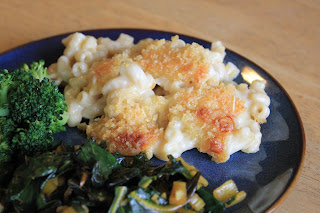
Truffled Mac and Cheese

I have a confession.  The husband and I eat a lot of mac and cheese.  Kraft... mac and cheese.  As much as I enjoy home cooked meals, I haven't ever found a mac and cheese recipe that I like.  Until now.


To be fair, this recipe has been around the internet for quite awhile - it's a Martha Stewart recipe, after all.  But, I've put my own little spin on it by adding the truffle oil.  Truffle oil just makes everything a little bit better.  I recently had a truffled mac and cheese at a local restaurant and it was fantastic.  (And now I can save the $13 and just make my own!)  The truffle oil is optional, of course, if that's not quite your thing.

Also optional are all the veggies on the side.  Two different kinds of veggies make it healthy, right?  At least that's what I was telling myself when I was eating this meal.


The focus of this recipe is the cheese, obviously, so I would encourage you to splurge and get good stuff.  Not the yellow, rubbery block of preservatives that some companies call cheese.  But if all you have is some of that stuff, go for it, and get the good cheese the next time.


The original recipe calls for what is essentially croutons on top.  Which I think is weird.  I used panko bread crumbs instead, and I'm so glad I did.  It created a wonderful golden, crunchy crust that is the perfect foil for the gooey, creamy cheese inside.


Now, the original recipe also uses a 9 x 13 inch pan.  As much as we love mac and cheese, that was even a little extreme for us (but mostly our waistlines and wallets).  I halved the recipe which was perfect for us.  But if you need to feed a crowd, go ahead and make the full recipe.  Or if you want a lot of leftovers.  Bonus - this recipe reheats well!  As the husband says, "it's just awesome."

Truffled Mac and Cheese
(Adapted from Smitten Kitchen)
Makes 5-6 servings

4 tablespoons (1/2 stick) unsalted butter, plus more for casserole
1/2 cup panko breadcrumbs
2 3/4 cups milk
1/4 cup all-purpose flour
1 teaspoon coarse salt, plus more for water
Pinch ground nutmeg
Pinch teaspoon freshly ground black pepper
Pinch teaspoon cayenne pepper
2 1/4 cups (about 9 ounces) grated sharp white cheddar cheese
1/2 cup (about 2 ounces) grated Gruyère
1/4 cup + 1 Tbsp (about 1.2 ounces) grated Pecorino Romano cheese
1 Tbsp white truffle oil
1/2 pound elbow macaroni

1. Preheat oven to 375°F. Butter a 2-quart casserole dish; set aside. Place the panko breadcrumbs in a medium bowl. In the microwave, melt 1 tablespoon of butter. Pour the melted butter into the bowl with the breadcrumbs, and toss. Set the breadcrumbs aside.

2. Warm the milk in a medium saucepan over medium heat. Melt the remaining 3 tablespoons butter in a high-sided skillet over medium heat. When the butter bubbles, add the flour. Cook, stirring, 1 minute.

3. While whisking, slowly pour in the hot milk a little at a time to keep mixture smooth. Continue cooking, whisking constantly, until the mixture bubbles and becomes thick, 8 to 12 minutes.

4. Remove the pan from the heat. Stir in salt, nutmeg, black pepper, cayenne pepper, truffle oil, and about 3/4 of the cheese; set the cheese sauce aside.

5. Cover a large pot of salted water, and bring to a boil. Cook the macaroni until the outside of pasta is cooked and the inside is underdone, 2 to 3 minutes. Transfer the macaroni to a colander, rinse under cold running water, and drain well. Stir the macaroni into the reserved cheese sauce.  It will seem like there is too much cheese sauce, but I promise that there isn't!  All that extra sauce not only tastes great, but helps it reheat well.

6. Pour the mixture into the prepared dish. Sprinkle the remaining cheese, and the breadcrumbs over the top. Bake until golden brown, about 30 minutes (though we needed a bit more time to get it brown, but your oven may vary). Transfer the dish to a wire rack for 5 minutes; serve.

Enjoy!

Tuesday, September 3, 2013

Dark Chocolate Cupcakes with Basil Buttercream

Earlier this summer I was at my favorite chocolate factory perusing their delightful offerings and trying not to drool.


They had a smaller specialty bar that I hadn't seen before, the Basilico Pignoli.  A chocolate bar with basil pesto in it.  I was intrigued by this savory and sweet combination.  I purchased it and was pleasantly surprised at how well those flavors went together.  This cupcake was inspired by that chocolate bar.  Incidentally, that bar ended up being the chocolate sprinkles on top of the cupcakes.  A nice symmetry, no?  :-)


I should say, also, that I made this for a friend's birthday.  She happens to love basil pesto, so she seemed like the perfect recipient for these.  And, as I suspected, she loved these as well.
 

For the recipe, I combined a few different recipes to get the best balance of flavors.  I already had a fantastic dark chocolate cupcake recipe that I have paired with a tasty peanut butter frosting.  (Actually, I made those last year for this same friend!)  And then I found the perfect frosting from the awesome experimental Cupcake Project blog.


She infused the basil flavor into the frosting by first making a "basil sugar."  Then whipping it up in a normal buttercream.  The balance was perfect, and I was delighted that it worked so well.


Overall, it's a unique flavor combo that is divine.  I WILL be making these again.  And again.  And again...


Dark Chocolate Cupcakes
(Recipe adapted from Cook’s Illustrated)
Makes 12 cupcakes

8 tablespoons (1 stick) unsalted butter, cut into 4 pieces
2 ounces bittersweet chocolate, chopped
½ cup (1.5 ounces) cocoa powder
¾ cup (3.75 ounces) all-purpose flour
½ teaspoon baking soda
¾ teaspoon baking powder
2 eggs
¾ cup (5.25 ounces) granulated sugar
1 teaspoon vanilla extract
½ teaspoon table salt
½ cup (4 ounces) sour cream

Adjust oven rack to lower-middle position and preheat to 350 degrees F. (If you are using a non-stick muffin pan, heat the oven to 325 degrees F.) Line standard-size muffin pan with baking cup liners.

Combine butter, chocolate, and cocoa in medium heatproof bowl. Set bowl over saucepan containing barely simmering water; heat mixture until butter and chocolate are melted and whisk until smooth and combined. (Alternately, you can microwave the mixture at 50% power, stirring every 30 seconds until completely melted.) Set aside to cool until just warm to the touch.

Whisk flour, baking soda, and baking powder in small bowl to combine.

Whisk eggs in second medium bowl to combine; add sugar, vanilla, and salt until fully incorporated. Add cooled chocolate mixture and whisk until combined. Sift about one-third of flour mixture over chocolate mixture and whisk until combined; whisk in sour cream until combined, then sift remaining flour mixture over and whisk until batter is homogeneous and thick.

Divide the batter evenly among muffin pan cups. Bake until skewer inserted into center of cupcakes comes out clean, 18 to 20 minutes.  Do not overbake, or they will be dry.

Cool cupcakes in muffin pan on wire rack until cool enough to handle, about 10-15 minutes. Carefully lift each cupcake from muffin pan and set on wire rack. Cool to room temperature before icing, about 30 minutes.


Basil Sugar
(from Cupcake Project)

1 large handful of fresh basil leaves
1 cup sugar (granulated or powdered sugar, depending on what you're going to use it for)

Rinse basil leaves and gently pat dry with a towel.
Pulse basil leaves in a food processor until they are as small as you can get them. Don't worry if there are still some big pieces since you'll process them further in a bit. You should end up with about one packed tablespoon of chopped up basil. Add more basil or remove some if you are too far off.
Place processed basil and sugar in a small bowl and use a spoon to mix well, pressing the basil into the sugar.
Place the basil sugar in the food processor and pulse to fully combine.
If not using within three days, store in the freezer until ready to use.
If basil sugar starts to get clumpy, pulse again in a food processor just before using.


Basil Buttercream
(from Cupcake Project)
Makes enough for 12 cupcakes (not piled high)

1/2 cup unsalted butter, room temperature
1 cup basil powdered sugar
1 cup powdered sugar
1/4 teaspoon salt

In a medium-sized mixing bowl, beat butter until light and fluffy, about 3 minutes on high speed.
Mix in basil powdered sugar a little bit at a time.
Mix in powdered sugar a little bit at a time.
Mix in salt.
Pipe or spread onto cooled cupcakes.

Enjoy! 
 

Monday, August 26, 2013

Curried Corn & Veggie Chowder (Vegan)

Have you been enjoying this beautiful summer?  I certainly have.  Today we had a typical rainy Pacific Northwest day, so it's time to catch up on some blog posts!


I've been cooking a lot out of one of my new cookbooks, Appetite for Reduction, and so far everything (but one dish) has been awesome.  I don't think I've ever had such success with a cookbook before... although I will admit I'm not sure I've ever made this many things out of one book.  At any rate - it's fantastic.  Easy, relatively quick, healthy and no funky ingredients - love it!


This particular chowder is really great, and unlike any other I've had before.  It's especially perfect for right now when the farmer's markets are full and you've got corn and zucchini coming out your ears.  It's very flavorful and goes well with a big, crunchy salad.  Or to make it a real meal on it's own, I've taken to adding a bit of cooked brown rice to it.  Perfection.


 Without further ado - make this!


Curried Corn & Veggie Chowder (Vegan)
(from Appetite for Reduction
 Makes 4-6 servings

1 tsp canola oil
1 cup shallots, chopped finely
1 red bell pepper, seeded and chopped finely
4 cloves garlic, minced
1 Tbsp minced fresh ginger
1/4 - 1/2 tsp red pepper flakes (optional, and to your preference of spiciness)
1 zucchini (about 1/2 pound), 1/4 inch dice
1 3/4 cup corn, from 3 ears corn (reserve cobs)
1/2 tsp salt
3 cups vegetable broth
2 tsp arrowroot powder
1/2 cup peeled, finely chopped carrots (I really cheat and get shredded carrots and just roughly chop them from there)
1 heaping Tbsp mild curry powder
3/4 cup light coconut milk
Juice of 1/2 lime, or to taste
Fresh cilantro, for garnish (optional)
Cooked brown rice (optional)

Preheat a 4-quart pot over medium-high heat.  Saute the shallots and red bell pepper in the oil until translucent, about 4 minutes.  Use a little broth, if it's sticking.  Add the garlic, ginger, and red pepper flakes, and saute for another minute.  Add the zucchini and corn and sprinkle in the salt.  Cook for about 3 minutes, stirring once.

Measure 1 cup of the broth into a measuring cup.  Mix in the arrowroot with a fork until dissolved.  You do this because it's just easier to get the arrowroot dissolved into smaller quantities of liquid.  Add the arrowroot mixture to the pot, along with the rest of the broth.  Mix in the carrots and curry powder.  boil.  Once boiling, break the corn cobs in half and add them to the pot (they add a fantastic depth of flavor).  Lower the heat to a simmer and cook for about 20 minutes, or until the vegetables are tender.  Remove the corn cobs.  Add the coconut milk and lime juice.

Use an immersion blender to blend about half the soup  If you don't have an immersion blender, I'm sorry!  Transfer half of the soup to a blender or food processor and puree until smooth, then add back to the pot.  If the soup is still steaming hot, make sure to either keep the opening on top of your food processor open, or lift the lid often for steam to escape.  If steam builds up in a closed container it can explode the lid off and ruin your day.

Taste for seasoning.  Serve garnished with cilantro, if you like.

Saturday, August 3, 2013

Chocolate Chip Cookies (Vegan)

I believe I'm lucky enough to already have the perfect chocolate chip cookie recipe, however it's not vegan friendly at all.  One morning, before work, I had a craving for cookies (c'mon, it's not that weird), and thought I'd give this vegan recipe a shot.

I love how quickly some of these vegan cookies come together.  When the husband came out of the bedroom, all ready for work, he was pleasantly surprised with the baked cookie scent wafting throughout the apartment.  In the morning?!?!?

(There really is no better way to start your day than a freshly baked cookie.  Just saying.)


Because it's vegan I didn't have to soften any butter, or cream the butter and sugar, and that saved quite a bit of time.  The base is white and brown sugars with oil that you beat with a fork until it's the texture of caramel (about 2 minutes).  A chemical reaction occurs when the sugars and oil mix, and if you get lazy about this step you will be left with some greasy, separated cookies and then nobody has a good time.


I brought these cookies to the office and everyone was so impressed - you baked these before work???  Little do they know how quick and easy it was.


The flavor was very good, and I seriously doubt anyone would have known they were vegan unless I had told them.


Do you have some vegan friends to bake for?  Are you out of butter/shortening/eggs?  Do you just want a quick and tasty cookie?  This is the recipe for you!


Chocolate Chip Cookies

(from Post Punk Kitchen)
Makes ~ 2 dozen cookies

1/2 brown sugar
1/4 white sugar
2/3 cup canola oil
1/4 cup unsweetened almond milk (or your favorite non-dairy milk)
1 tablespoon tapioca flour (arrowroot or cornstarch are suitable substitutes)
2 teaspoons pure vanilla extract

1 1/2 cups all purpose flour (I had to use 2 cups because it was just too wet to hold any shape)
1/2 teaspoon baking soda
1/2 teaspoon salt

3/4 cups chocolate chips
     (If you're looking for vegan chocolate chips, Whole Foods has some, or you can use Ghirardelli     Semi-Sweet Chocolate Chips that contain no dairy products).

Preheat oven to 350 F. Line baking sheets with parchment paper.

Mix together sugars, oil, milk and tapioca flour (or substitute) in a mixing bowl. Use a strong fork and mix really well, for about 2 minutes, until it resembles smooth caramel. There is a chemical reaction when sugar and oil collide, so it’s important that you don’t get lazy about that step. Otherwise the sugar and oil will separate during baking and create a gross, greasy mess on your cookie sheet.  Mix in the vanilla.

Add 1 cup of the flour, the baking soda and salt. Mix until well incorporated. Mix in the rest of the flour. Add in extra flour if the dough is too wet, like mine was.  Fold in the chocolate chips.

Drop rounded tablespoon of dough onto lined baking sheet. They will spread just a bit. Place on a baking sheet and bake for about 6-8 minutes until they are just a little browned around the edges. I did have to bake mine a little bit longer due to the wetness of the dough.  Let cool on the baking sheet for about 5 minutes then transfer to a cooling rack.


Enjoy!

Sunday, July 21, 2013

Mexican Hot Chocolate Snickerdoodles (vegan)

I've been making many tasty things in the past few weeks, but I haven't been diligent about taking photos and posting.  Too busy eating, I suppose.  Oops.  My apologies, dear Reader(s)!


However, I do have this recipe for you, and it's great.  A simple cookie that's a twist on a classic, and it just so happens to be vegan.


When you first bite into it, you taste chocolate, "oh, how nice..." and then the creeper cayenne comes in with a bit of heat for a surprise.


After eating a cookie or five two, it dawned on me what the perfect beverage would be to accompany them - horchata!  Luckily, I happened to have some on hand, and the cool, cinnamon-laced rice drink was absolutely wonderful after the depth and kick of the cookies.  I don't have the recipe posted for that quite yet, but I will - promise!


Mexican Hot Chocolate Snickerdoodles
(from Vegan Cookies Invade Your Cookie Jar)
Makes 2 dozen cookies

For the topping:
1/3 cup sugar
1 teaspoon ground cinnamon

For the cookies:
1/2 cup canola oil
1 cup sugar
1/4 cup pure maple syrup
3 tablespoons almond milk (Or your preferred non-dairy milk)
1 teaspoon vanilla extract
1 teaspoon chocolate extract (or more vanilla extract if you have no chocolate)
1 2/3 cups flour
1/2 cup unsweetened cocoa powder
1 teaspoon baking soda
1/4 teaspoon salt
1/2 teaspoon cinnamon
1/2 teaspoon cayenne

Preheat oven to 350 F. Line 2 large baking sheets with parchment paper.

Mix the topping ingredients together on a flat plate. Set aside.

In a medium mixing bowl, use a fork to vigorously mix together oil, sugar, syrup, and milk. Mix in extracts.

Sift in remaining ingredients, stirring as you add them. Once all ingredients are added mix until you’ve got a pliable dough.

Roll dough into walnut sized balls. Pat into the sugar topping to flatten into roughly 2 inch discs. Transfer to baking sheet, sugar side up, at least 2 inches apart (they do spread). This should be easy as the the bottom of the cookies should just stick to your fingers so you can just flip them over onto the baking sheet. Bake for 10 to 12 minutes, they should be a bit spread and crackly on top. Remove from oven and let cool for 5 minutes, then transfer to a cooling rack to cool completely.

Enjoy!

Tuesday, July 16, 2013

Chickpea Sauté with Greek Yogurt

Have you ever encountered a recipe that really is a collection of ingredients you wouldn't think to group together, but end up being an absolutely fantastic dish?


A friend of mine made this for a party and gave me a pre-party taste.  I was a bit wary at first, thinking it would be some fancy-schmancy dish that wasn't my thing... but I was pleasantly surprised.  It was so good!  So good, in fact, that at the party I kept sneaking back to the big platter of it to grab some more and hope no one noticed my four multiple helpings.


When I asked my friend for the recipe I thought it would be a long and complicated recipe.  Nope!  It's super easy and quick, especially with a shortcut with the greens.  It's a fairly healthy dish, and with the addition of some brown rice or quinoa you have yourself a solid meal.


This was my first time cooking with fresh mint, which is apparently only sold in large bunches.  Mojitos, anyone?  It also uses caraway seeds, which gives rye bread its distinctive taste.  The husband dislikes rye bread (odd, in my opinion), so I thought this dish would be a flop for him.  However, he liked it too!


Because of the ease, the amazing flavor, and the healthy ingredients, this will definitely be a staple in our home!

Chickpea Sauté with Greek Yogurt
(from Plenty)
Serves 4+

10-12 oz. Baby kale or green of your choice (swiss chard, etc)
1/3 cup olive oil (which seems a bit extreme, so I cut it back to 1/4 cup or less)
4 medium carrots, peeled and cut into 1/4 inch dice
1 tsp caraway seeds
1 can chickpeas
1 garlic clove, crushed
1 Tbsp fresh mint, chopped
1 Tbsp fresh cilantro, chopped
1 Tbsp lemon juice
Salt and black pepper
1/2 cup Greek yogurt
1 Tbsp olive oil
Prepared quinoa or brown rice (optional)

(The original recipe calls for blanching 3/4 lb. swiss chard and chopping roughly.  Feel free to do that, but I preferred the ease of using baby kale)
**7/22/13 EDIT: I recently made this recipe and blanched a mix of swiss chard (chopped stems and leaves) and kale, as listed in the original recipe, and really enjoyed it that way as well!

Heat up the olive oil in a large saucepan.  Add the carrots and caraway seeds and sauté for 5 minutes on medium heat.  Add the greens and the chickpeas, cover, and cook for roughly 6 minutes, or until the greens are wilted.  Now add the garlic, herbs, lemon juice, and some salt and pepper.  Remove from the heat and cool down a little.  Taste and adjust the seasoning.

To serve, mix together the yogurt, olive oil and some salt and pepper.  If using a cooked grain, spoon grain into bowl.  Pile the vegetables on the grain and spoon the yogurt on top.

Enjoy!

Thursday, July 4, 2013

Blueberry Yogurt Multigrain Pancakes

How about a little patriotism for breakfast?


We've made these before, but they weren't the most photogenic.  Mostly because I used our super fancy stainless steel pan (that is still beyond us, apparently) and even with a bunch of butter they burned and stuck pretty badly.  So, today we went with good ole non-stick and coconut oil.  And the results were lovely.  And YUMMY.


To top them off I pureed some strawberries, added a bit of agave nectar and lemon juice and reduced it on the stove.  It made a great syrup that was tasty, wasn't too sugary and complimented the theme of the day.  ;-)


Usually when I eat pancakes I end up leaving the table feeling full and icky from all the sugar and then being hungry 2 hours later.  These are the perfect answer for the desire for pancakes without that gross feeling.  Make and eat without regret!

'Murica!  Happy Independence Day!

Blueberry Yogurt Multigrain Pancakes
(from Smitten Kitchen)
Makes ~ dozen pancakes

2 large eggs
1 cup plain, full-fat yogurt (we used Noosa)
2 to 4 Tbsp milk
3 tablespoons butter, plus extra for buttering skillet (or use coconut oil for the skillet)
1/2 teaspoon lemon zest
1/2 teaspoon vanilla extract
1/2 cup (62 grams) whole wheat flour
1/2 cup (68 grams) all-purpose flour
1/4 cup (32 grams) barley or rye flour
2 tablespoons sugar
1 tablespoons plus 1 teaspoons baking powder
1/2 teaspoon table salt
1 cup blueberries, rinsed and dried

Melt half of butter. Remove from heat and stir in second tablespoon of butter until melted. This keeps your butter from being too hot when you next want to add it to the wet ingredients.

Whisk egg and yogurt together in the bottom of a medium/large bowl. If you’re using a thin yogurt, no need to add any milk. If you’re using regular yogurt, stir in 2 tablespoons milk. If you’re using a thick/strained or Greek-style yogurt, add 3 to 4 tablespoons milk. Whisk in melted butter, zest and vanilla extract. In a separate, small bowl, combine flours, sugar, baking powder and salt. Stir dry ingredients into wet only until dry ingredients are moistened. A few remaining lumps is fine.

Preheat your oven to 200°F and have a baking sheet ready (to keep pancakes warm). Heat your skillet or saute pan to medium-low.  (Always better to start lower to avoid the burnt first batch!)  Melt a pat of butter or coconut oil in the bottom and ladle a scant 1/4 cup (about 3 tablespoons) batter at a time, leaving at space between each pancake. Press a few berries into the top of each pancake. The batter is on the thick side, so you will want to use your spoon or spatula to gently nudge it flat, or you may find that pressing down on the berries does enough to spread the batter. When the pancakes are dry around the edges and you can see bubbles forming on the top, about 3 to 4 minutes, flip them and cook for another 3 minutes, until golden underneath. (If you listen closely, after a minute you’ll hear you blueberries pop and sizzle deliciously against the pan.) If pancakes begin cooking too quickly, lower the heat. Transfer pancakes to warm oven as they are done cooking, where you can leave them there until you’re ready to serve them.  Serve with your favorite fixings (a fruit syrup or maple syrup is great!)

Enjoy!

Friday, June 28, 2013

Pink Lemonade Cookies

This June we've had a decent amount of sunny, nice weather and it's been making me crave light and summery foods.  So when I had to bake something for a potluck at work, pink lemonade was on my mind.  I've already made bars with that flavor, but wanted to try a cookie too.  (Apparently making everything but actual pink lemonade...hm...)


When looking for a recipe, most of them included either a mix of some kind (cookie or cake), concentrate, or food coloring.  Yuck!  I eventually found one that didn't use any of that, and it is awesome.


Fresh lemon juice and zest, with a splash of fresh, pureed strawberries create the flavor base.  Pureeing the strawberries was the perfect use of my itty bitty food processor. So cute, and guaranteed to send curious kitties racing away from the kitchen in terror from the scary appliance.


The dough was a bit wet to work with, but certainly not enough to be frustrating... or to discourage you from baking these tasty, little gems!


Bright, tangy, lemony flavor comes through with a bit of sweetness in these cookies.  It's a perfect balance.  The dough was tasty, but a cool, baked cookie was even better.  They were a hit at the potluck, as well as with some of the husband's coworkers as well!


Pink Lemonade Cookies
(from Healthy. Delicious.)
Makes ~ 1 1/2 dozen cookies

8 Tablespoons butter (1 stick), softened
1 cup granulated sugar
1 egg, at room temperature
4 large strawberries
½ teaspoon vanilla
1 Tablespoon fresh lemon zest
2 Tablespoonsfresh lemon juice (about 1 lemon)
2½ cups Flour
¼ teaspoon salt
¼ teaspoon baking powder
⅛ teaspoon baking soda
¼ cup powdered sugar

Heat oven to 350*F. Line 2 cookie sheets with parchment.

In a mixing bowl, cream together the butter and sugar until light and fluffy. Add the berries and vanilla to a food processor or blender and puree until smooth. Add ⅓ cup of the strawberry puree, egg, lemon zest, and lemon juice to the butter and sugar mixture.  You could discard any extra puree or save it for another use, like in your breakfast oatmeal or to flavor an adult beverage. ;-)  Mix well.

Stir in the flour, salt, baking powder, and baking soda until a wet dough forms.

Pour the powdered sugar into a small dish. Drop 1 Tablespoon dough into the powdered sugar. Roll into a ball; shake off excess sugar. Repeat with remaining dough. Arrange on a cookie sheet, 2 inches apart.

Bake 9-12 minutes, until no longer wet (the tops of the cookies will be shiny and slightly crinkled).

Enjoy!