Showing posts with label vegetarian. Show all posts

Sunday, September 15, 2013

Truffled Mac and Cheese

I have a confession.  The husband and I eat a lot of mac and cheese.  Kraft... mac and cheese.  As much as I enjoy home cooked meals, I haven't ever found a mac and cheese recipe that I like.  Until now.


To be fair, this recipe has been around the internet for quite awhile - it's a Martha Stewart recipe, after all.  But, I've put my own little spin on it by adding the truffle oil.  Truffle oil just makes everything a little bit better.  I recently had a truffled mac and cheese at a local restaurant and it was fantastic.  (And now I can save the $13 and just make my own!)  The truffle oil is optional, of course, if that's not quite your thing.

Also optional are all the veggies on the side.  Two different kinds of veggies make it healthy, right?  At least that's what I was telling myself when I was eating this meal.


The focus of this recipe is the cheese, obviously, so I would encourage you to splurge and get good stuff.  Not the yellow, rubbery block of preservatives that some companies call cheese.  But if all you have is some of that stuff, go for it, and get the good cheese the next time.


The original recipe calls for what is essentially croutons on top.  Which I think is weird.  I used panko bread crumbs instead, and I'm so glad I did.  It created a wonderful golden, crunchy crust that is the perfect foil for the gooey, creamy cheese inside.


Now, the original recipe also uses a 9 x 13 inch pan.  As much as we love mac and cheese, that was even a little extreme for us (but mostly our waistlines and wallets).  I halved the recipe which was perfect for us.  But if you need to feed a crowd, go ahead and make the full recipe.  Or if you want a lot of leftovers.  Bonus - this recipe reheats well!  As the husband says, "it's just awesome."

Truffled Mac and Cheese
(Adapted from Smitten Kitchen)
Makes 5-6 servings

4 tablespoons (1/2 stick) unsalted butter, plus more for casserole
1/2 cup panko breadcrumbs
2 3/4 cups milk
1/4 cup all-purpose flour
1 teaspoon coarse salt, plus more for water
Pinch ground nutmeg
Pinch teaspoon freshly ground black pepper
Pinch teaspoon cayenne pepper
2 1/4 cups (about 9 ounces) grated sharp white cheddar cheese
1/2 cup (about 2 ounces) grated Gruyère
1/4 cup + 1 Tbsp (about 1.2 ounces) grated Pecorino Romano cheese
1 Tbsp white truffle oil
1/2 pound elbow macaroni

1. Preheat oven to 375°F. Butter a 2-quart casserole dish; set aside. Place the panko breadcrumbs in a medium bowl. In the microwave, melt 1 tablespoon of butter. Pour the melted butter into the bowl with the breadcrumbs, and toss. Set the breadcrumbs aside.

2. Warm the milk in a medium saucepan over medium heat. Melt the remaining 3 tablespoons butter in a high-sided skillet over medium heat. When the butter bubbles, add the flour. Cook, stirring, 1 minute.

3. While whisking, slowly pour in the hot milk a little at a time to keep mixture smooth. Continue cooking, whisking constantly, until the mixture bubbles and becomes thick, 8 to 12 minutes.

4. Remove the pan from the heat. Stir in salt, nutmeg, black pepper, cayenne pepper, truffle oil, and about 3/4 of the cheese; set the cheese sauce aside.

5. Cover a large pot of salted water, and bring to a boil. Cook the macaroni until the outside of pasta is cooked and the inside is underdone, 2 to 3 minutes. Transfer the macaroni to a colander, rinse under cold running water, and drain well. Stir the macaroni into the reserved cheese sauce.  It will seem like there is too much cheese sauce, but I promise that there isn't!  All that extra sauce not only tastes great, but helps it reheat well.

6. Pour the mixture into the prepared dish. Sprinkle the remaining cheese, and the breadcrumbs over the top. Bake until golden brown, about 30 minutes (though we needed a bit more time to get it brown, but your oven may vary). Transfer the dish to a wire rack for 5 minutes; serve.

Enjoy!

Monday, August 26, 2013

Curried Corn & Veggie Chowder (Vegan)

Have you been enjoying this beautiful summer?  I certainly have.  Today we had a typical rainy Pacific Northwest day, so it's time to catch up on some blog posts!


I've been cooking a lot out of one of my new cookbooks, Appetite for Reduction, and so far everything (but one dish) has been awesome.  I don't think I've ever had such success with a cookbook before... although I will admit I'm not sure I've ever made this many things out of one book.  At any rate - it's fantastic.  Easy, relatively quick, healthy and no funky ingredients - love it!


This particular chowder is really great, and unlike any other I've had before.  It's especially perfect for right now when the farmer's markets are full and you've got corn and zucchini coming out your ears.  It's very flavorful and goes well with a big, crunchy salad.  Or to make it a real meal on it's own, I've taken to adding a bit of cooked brown rice to it.  Perfection.


 Without further ado - make this!


Curried Corn & Veggie Chowder (Vegan)
(from Appetite for Reduction) 
 Makes 4-6 servings

1 tsp canola oil
1 cup shallots, chopped finely
1 red bell pepper, seeded and chopped finely
4 cloves garlic, minced
1 Tbsp minced fresh ginger
1/4 - 1/2 tsp red pepper flakes (optional, and to your preference of spiciness)
1 zucchini (about 1/2 pound), 1/4 inch dice
1 3/4 cup corn, from 3 ears corn (reserve cobs)
1/2 tsp salt
3 cups vegetable broth
2 tsp arrowroot powder
1/2 cup peeled, finely chopped carrots (I really cheat and get shredded carrots and just roughly chop them from there)
1 heaping Tbsp mild curry powder
3/4 cup light coconut milk
Juice of 1/2 lime, or to taste
Fresh cilantro, for garnish (optional)
Cooked brown rice (optional)

Preheat a 4-quart pot over medium-high heat.  Saute the shallots and red bell pepper in the oil until translucent, about 4 minutes.  Use a little broth, if it's sticking.  Add the garlic, ginger, and red pepper flakes, and saute for another minute.  Add the zucchini and corn and sprinkle in the salt.  Cook for about 3 minutes, stirring once.

Measure 1 cup of the broth into a measuring cup.  Mix in the arrowroot with a fork until dissolved.  You do this because it's just easier to get the arrowroot dissolved into smaller quantities of liquid.  Add the arrowroot mixture to the pot, along with the rest of the broth.  Mix in the carrots and curry powder.  boil.  Once boiling, break the corn cobs in half and add them to the pot (they add a fantastic depth of flavor).  Lower the heat to a simmer and cook for about 20 minutes, or until the vegetables are tender.  Remove the corn cobs.  Add the coconut milk and lime juice.

Use an immersion blender to blend about half the soup  If you don't have an immersion blender, I'm sorry!  Transfer half of the soup to a blender or food processor and puree until smooth, then add back to the pot.  If the soup is still steaming hot, make sure to either keep the opening on top of your food processor open, or lift the lid often for steam to escape.  If steam builds up in a closed container it can explode the lid off and ruin your day.

Taste for seasoning.  Serve garnished with cilantro, if you like.

Friday, May 24, 2013

Shaved Asparagus Pizza

I had purchased asparagus with the intention of roasting it with shallots, but then I wanted to try something new.  After some searching, I found an intriguing recipe on Smitten Kitchen - Shaved Asparagus Pizza.  In my opinion, pizza is the perfect food, so this seemed like an excellent idea.


And an excellent idea it was!  The husband and I both loved it.  After eating dinner, I was posting on Facebook about how wonderful it was and our two friends down the hall just happened to drop by, and oh, what's that great smell?  ;-)  We found ourselves with some very willing taste testers who agree on the awesomeness of this recipe.


Now, I didn't follow the recipe exactly; I tweaked things here and there, but the recipe remains simple and delicious. So simple and delicious that I made it three times in the past week.  THREE.  I don't think I've done that with any recipe ever.  Well, except maybe this one.


I have a confession to make - I use a box mix for our pizza crusts.  I have some solid reasons though: 1) It tastes good and has a great crispy texture 2) It takes only a few minutes to prep, unlike from-scratch recipes that take at least an hour 3) It costs less than a dollar to purchase 4) You only have to add water, and a bit of flour for kneading.  Win-win-win-win!  So the Jiffy Pizza Crust is our stand-by whenever we make homemade pizza (a few times month).  If you're looking for it at your grocery store, it's usually by the pasta/sauces area, and not by the other Jiffy products in the baking aisle.


Back to the tasty pizza at hand.


I wanted to add just a little something at the end, and truffle salt fit the bill.  A bit of truffle oil would also work just fine.  Or you could skip it all together.  It's certainly not necessary, but I'd highly recommend it.  It really added the final 'wow' factor!


Shaved Asparagus Pizza
(from Smitten Kitchen site and book)
Makes 1 full size pizza - number of servings is up to you!

1 recipe your favorite pizza dough (I recommend a Jiffy crust for ease!)
1 fresh mushroom, chopped finely
1 Tbsp shallot, chopped finely
1/2 pound asparagus
1/4-1/2 cup grated Parmesan and/or Pecorino
1/2 pound mozzarella, shredded or cut into small cubes
2 teaspoons olive oil
1/2 teaspoon coarse salt
Several grinds black pepper
1/4-1/2 tsp. dried rosemary, chopped or ground - or use fresh
Truffle salt/oil (optional)

Oven: Preheat your oven to the hottest temperature it goes, or about 500 in most cases. If you use a pizza stone, have it in there.

Prepare asparagus: No need to snap off ends; they can be your “handles” as you peel the asparagus. Holding a single asparagus spear by its tough end, lay it flat on a cutting board and using a vegetable peeler (a mandolin would also work, in theory, but she found it more difficult to do it that way), create long shavings of asparagus by drawing the peeler from the base to the top of the stalk. Repeat with remaining stalks and don’t fret some pieces are unevenly thick (such as the end of the stalk, which might be too thin to peel); the mixed textures give a great character to the pizza. Discard tough ends. Pat asparagus dry with paper towel (I noticed my pizza got a bit 'wet' without doing this).  Toss peelings with chopped shallot, olive oil, dried rosemary, salt and pepper in a bowl.

Assemble and bake pizza: Roll or stretch out your pizza dough to a 12-inch round. Either transfer to a floured or cornmeal-dusted pizza peel (if using a pizza stone in the oven) or to a floured or cornmeal-dusted tray to bake it on. IF you're using a Jiffy crust, pre-bake the crust as directed (at 425 degrees). 

Sprinkle pizza dough with Parmesan/Pecorino (save a bit for the top) and chopped mushroom, then mozzarella. Pile asparagus on top. Top with remaining Parmesan/Pecorino. Bake pizza for 10 to 15 minutes, or until edges are browned, the cheese is bubbly and the asparagus is lightly charred. Remove from the oven and immediately sprinkle truffle salt or oil, then slice and eat.

Grilling
We have this wonderfully long weekend ahead of us that usually involves some serious grilling.  If you're so inclined, this would likely be perfect for that!  Throw the whole dough down on an oiled grill and let it cook for a few minutes on the underside. Pull it off with tongs, flip it out onto a plate and pile the toppings on the grilled side, before sliding the raw side back onto the grill. Grill the pizza with the lid down for a few minutes, or until everything is bubbly and brown.  

Enjoy!

Sunday, February 24, 2013

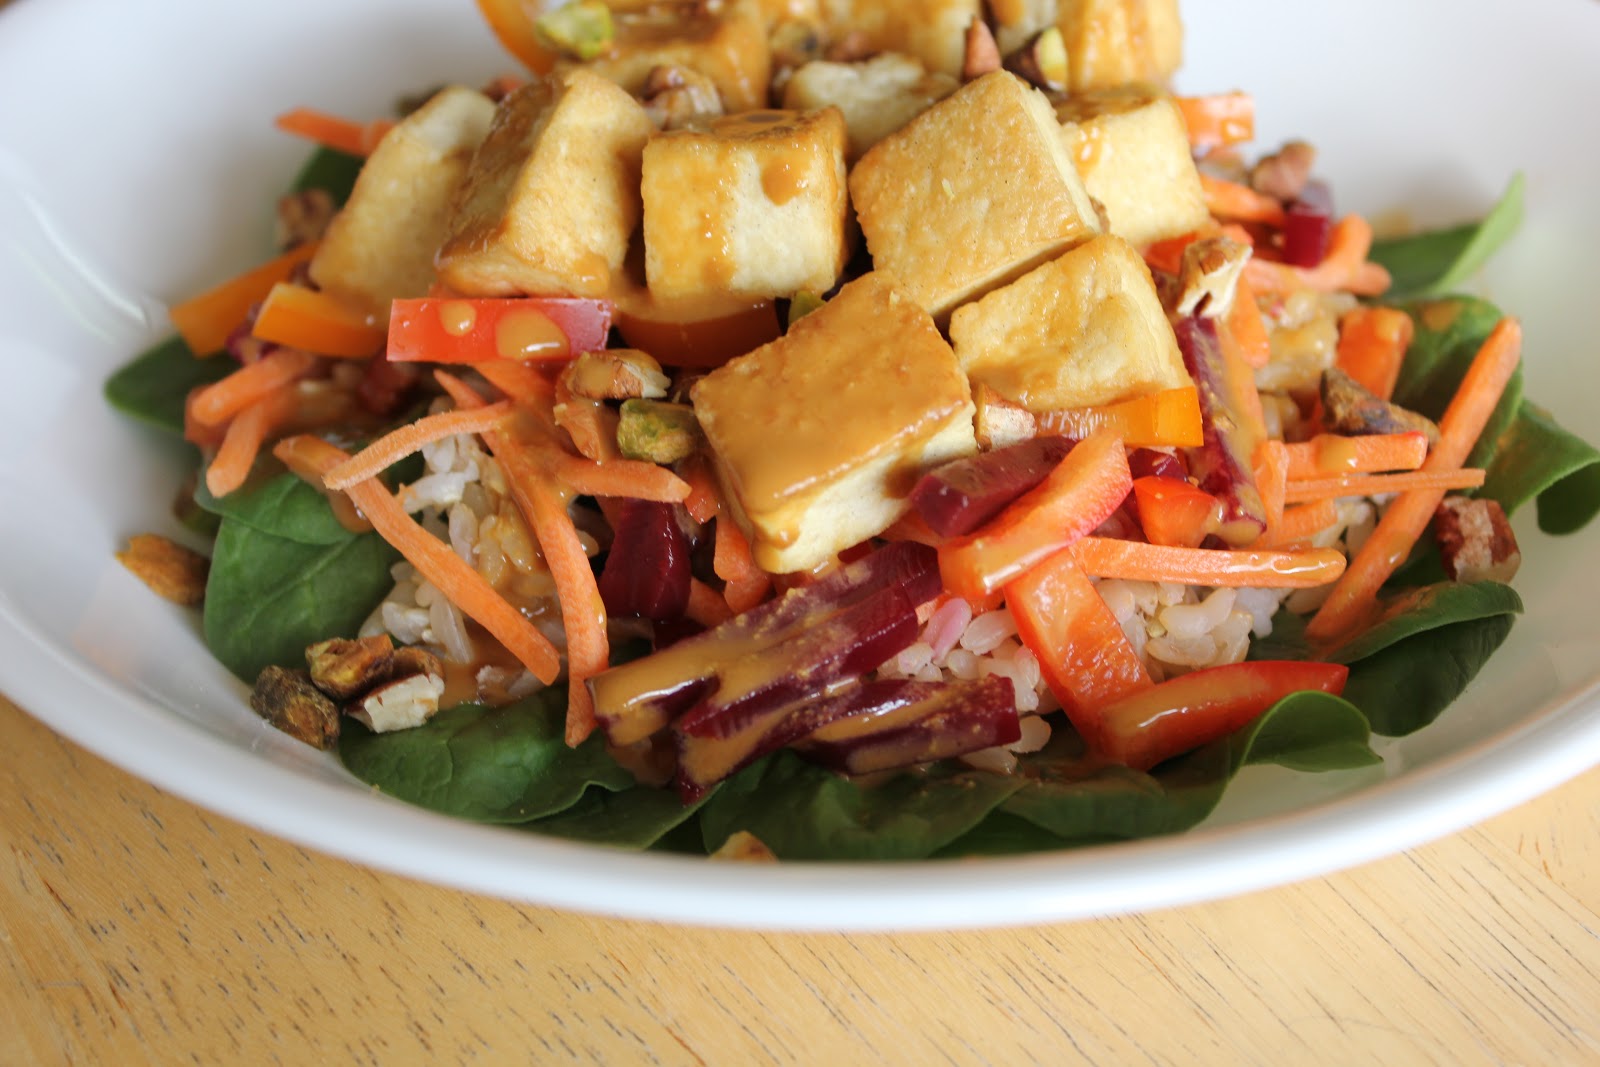
Glory Bowl (Vegan)

One day I was lamenting about not having any fast and healthy recipes for weeknight dinners.  We always resort to mac n cheese... anyone else?  My friend of mine offered up this recipe.  I was a little wary and only because I feared it would taste too... hippy-dippy healthy.  I was pleasantly surprised!


There is a bit of prep work, but it's very easy, and once you have everything ready you can throw together a meal in record time.  I was in luck that the Husband was cooking up some tofu for a favorite - Tofu & Veggie Stir Fry.  So I batted my eyelashes and asked that he cook up another package.  Cooking the brown rice was a snap because we have a rice maker.  That only left the dressing.


When I set out all of the ingredients for the dressing, I thought it seemed like an odd collection of things.  Tossed it in the blender and bam, done.  I dipped in a spoon to taste it, like a good chef, and nearly fell over from the strength of flavors.  Did I do something wrong?  I only forgot the water.  Oops.  Needless to say, a little goes a long way with this dressing.  Tread carefully!


It seems very unassuming, but the combination of the ingredients and the dressing come together wonderfully.  It was tasty, healthy, very satisfying, and as I hoped - easy.  It's also very flexible in your preference of veggies, so you can adjust it to your tastes.  In fact, next time I think I'll also add some chopped apple, for a bit of added sweetness.  This has earned a place in my lunch/dinner rotation!

Glory Bowl
(from Whitewater Cooks)
Serves 4

1 cup dry brown rice
Baby spinach
Shredded carrots
1 can julienned beets (or you could shred raw carrots)
Mini sweet peppers (Not in original recipe, but I love them and it tasted great)
1 pkg extra firm tofu
Toasted almonds (or your favorite nut)

Dressing:
1/2 cup nutritional yeast flakes
1/3 cup water
1/3 cup tamari or soy sauce
1/3 cup apple cider vinegar
2 cloves garlic, crushed
1/2 cup olive oil (original recipes calls for 1 1/2 cups, which seems extreme!)
2 Tbsp almond butter or tahini paste (I used tahini, since I had it)

Cook brown rice in your preferred method.
Heat 1 Tbsp. oil in wok over medium-high heat.  Add tofu, and cook until golden brown.  Transfer to a plate (and set on paper towels to drain if you're concerned about excess oil).

Put all dressing ingredients in blender and blend until smooth.  Store in airtight container in the fridge.

To serve, place 1/2 cup cooked brown rice in bowl.  Top with 1/4 cooked tofu (warmed), and layer with veggies and toasted almonds.  Pour dressing on top just before serving.

Enjoy!

Saturday, January 12, 2013

Melty Cheese Croutons on a Salad

Look, a salad!  Back to some semblance of nutritious and healthy meals.  Well, sort of.  It's a great salad topped with pan-fried, panko-coated, cheesy goodness.  It's protein, so it's fine.  Yes, we're going with that.


This salad has become a weeknight staple for us, and we've got the procedure down pretty well.  We like to serve it with a local artisan rosemary bread, and makes it a wonderful meal.


I've trimmed down the amount of cheese used, only because the original amount was just too much (and we love cheese).  You don't want to finish a salad and have the "ughhhh" feeling.  That's for Thanksgiving.  Or the Super Bowl.  Or a lonely Friday night when you've eaten ice cream straight from the carton.


We also adjusted the ratio slightly as we preferred a bit more of the jack than the goat cheese.  But you can tweak this to your own tastes.  We used a basic goat cheese from Trader Joe's, and a local jack from Mt. Townsend Creamery - New Moon.  This time I also threw in a bit of Beecher's Flagship cheese, just because we had it.


 A tart, fruity vinaigrette cuts through the richness of the cheese in a great way, and is the perfect topping.  This salad has a lot of potential for versatility, and I look forward to updating it with the seasons.


Melty Cheese Croutons on a Salad
(from Smitten Kitchen)
Makes 2 servings of 3 medallions each

Croutons
2 oz. goat cheese, left out to warm and soften a bit
3 oz. semi-firm cheese of choice (we used a jack, Smitten Kitchen used a soft gouda), grated
1 Tbsp all-purpose flour
1 egg
3 Tbsp Panko breadcrumbs
2-3 Tbsp Olive Oil, for frying

Salad
Mixed greens, of choice (we use spinach)
Carrot, chopped
Sweet peppers, chopped
Beets, roasted and chopped (or if you're lazy like us, canned)
Apple or pear, chopped
Craisins
Fruity vinaigrette, of choice (we use a pomegranate vinaigrette)

Prepare veggies, and toss in individual bowls.  Set aside, ready and waiting for the croutons!

Mash together cheeses in a bowl, mixing until combined. Form the mixture into six 1-2 inch balls and then flatten each slightly into thick patties. Arrange three small dishes for dredging stations: Place the flour in the first one, beat the egg lightly in the second, and mix the breadcrumbs and salt in the last one.

Heat olive oil in a small skillet over medium heat. Once hot, fry each patty until golden and crispy, about two minutes per side. It’s going to get melty, and seem pesky to flip once warm, but that's okay, it's worth it!  Turning with two forks made it slightly less difficult.

If they are quite oily, briefly pause the crouton on paper towels to drain excess oil.  Ours usually aren't, so we put them directly on top of the salad, and top with a fruity vinaigrette.  Serve with your favorite artisan bread.

Enjoy!

Thursday, January 10, 2013

Peanut Butter Cup Smoothie

It's after dinner.  You're craving something chocolaty.  With peanut butter.  But you want to avoid a calorie bomb - what to do????  Have no fear, I've got a solution!  A health(ier) peanut butter cup smoothie.


It's simple, easy, and has some nutritional value (versus that Ben and Jerry's that you were contemplating, or is that just me?)  Fruit, bit of protein from the peanut butter, and some antioxidants from the cocoa.  Okay, so it's not kale and pomegranates, but it's certainly better than a sugar and fat laden Chocolaty Cake of Death.


I've also used this when I'm trying to cut back on my added sugar intake (or cut back on desserts), and this is an excellent substitute.  It's also a great post-workout smoothie.  Give it a try!


Peanut Butter Cup Smoothie
(adapted from Happy Herbivore)
Makes 2 servings

2 bananas
3 Tbsp good quality cocoa
3 Tbsp peanut butter
1/2 tsp vanilla extract
1/2 cup - 1 cup of non-dairy milk (I like almond milk), to your preferred texture
Couple ice cubes, optional

Blend together bananas, cocoa, peanut butter, vanilla and 1/2 cup non-dairy milk.  Add milk and ice cubes to desired texture.  Find a friend, and share.

Enjoy!

Monday, January 7, 2013

Sweet Potato Hummus

Hummus and I... have never gotten along.  I keep trying hummus because it always sounds like a good idea.  But it never, ever lived up to my expectations.  I tried different brands, different styles, and all with the same result.  Utter disappointment.  However, I spotted this recipe in a friend's cookbook and decided to give it a shot.  Again.  And, miraculously, I loved it!


I really shouldn't be surprised because I love sweet potato in just about everything - marshmallows, soup, tacos, biscuits, etc.  And now I can add hummus to that list - hooray!


Light snack or fun appetizer for a party, and it's healthy.  Oh, and it makes a LOT, so plenty to share with friends!

Sweet Potato Hummus
(from Power Foods)
Makes 4 cups

1 lb. sweet potatoes (about 2)
1 can (15 oz.) chickpeas, drained and rinsed
1/4 cup lemon juice (from 1-2 lemons)
1/4 cup tahini (sesame seed paste)
2 Tbsp olive oil
2 teaspoons ground cumin
1 garlic clove, finely chopped
Salt and pepper to taste
Paprika, for garnish

Steam the sweet potatoes with your preferred method.  Some options:
1) Microwave: Wash and pat dry your potatoes.  Poke potatoes a few times on each 'side' for the steam to escape.  Microwave until soft, rotating them every few minutes for even cooking. When done, scoop out the inside and discard the peel.
OR
2) Peel and cut potatoes into 1 inch pieces.  Fill a large pot with 2 inches of water; set a steamer basket (or colander) inside pot, and bring water to a boil.  Add potatoes, reduce heat to a simmer, cover, and cook until potatoes are tender, 10 to 12 minutes.

Transfer potatoes to a food processor.  Add chickpeas, lemon juice, tahini, oil, cumin, and garlic.  Puree until smooth, about 1 minute; thin with up to 2 Tbsp of water (I used about 3 teaspoons).  Add salt and pepper to taste.  Let cool; refrigerate for up to 1 week in an airtight container.  Garnish with paprika before serving.  Serve with favorite pita chips and/or veggies.

Enjoy!

Saturday, July 28, 2012

Summer Vegetarian Tacos

I had an itch for tacos with fresh ingredients that were light and summery, and stumbled across this interesting sounding saute on Post Punk Kitchen.  It wasn't for tacos, necessarily, but I thought it might work well. 


It also had seitan (pronounced say-TAN, not satan, ha!) in it, which I was intrigued to try.  The meat-loving fiance was willing to give it a try (bless him and his tolerant taste buds).  I had to buy it at Whole Foods, but I never mind having an excuse to go there, really.  If you can't find seitan, feel free to use black beans instead.


The result?  Awesomely tasty.  Really.  They were fresh tasting, yet the seitan and mushrooms lend a wonderful savory and meaty flavor (and texture).  I wasn't sure what to expect with this experiment, but it turned out amazing.  Next time we might add some fresh slaw or rice, just to mix it up. It was very easy to throw together, so we will definitely be making this regularly!


Summer Vegetarian Tacos
(adapted from The Post Punk Kitchen)
Makes 4-5 tacos

Taco Filling
2 tablespoons olive oil, divided
1 medium red onion, in thinly sliced half moons
1 jalapeno, thinly sliced (seeds removed if you want less heat)
8 oz seitan, thinly sliced
1 cup fresh corn kernels, from 2 ears of corn (you can use frozen corn, in a pinch, but not ideal)
8 oz cremini mushrooms, sliced into thin strips
1/4 cup chopped fresh cilantro
1/2 teaspoon salt
Fresh black pepper
3 cloves garlic, minced
3 tablespoons fresh lime juice

Avocado Cream
2 ripe avocados
1/4 - 1/3 cup sour cream (to taste)
Pinch of salt

Small flour tortillas
2-3 small tomatoes, chopped
Queso fresco cheese, crumbled
Hot sauce (if you need more heat)
Fresh cilantro, chopped
 
Preheat a large, heavy bottomed pan over medium-high heat. Saute onion and jalapeno in two teaspoons oil and a pinch of salt, until translucent, 3 to 5 minutes.
Add the seitan and corn, and an additional tablespoon of oil and cook for about 5 minutes, until seitan is lightly browned, stirring often.
Add the mushrooms, cilantro, salt and pepper and cook for about 5 minutes.
Push everything to one side of the pan so that you have space to quickly saute the garlic. Put the remaining teaspoon of olive oil in the pan and toss in the garlic, stirring as it sizzles, for about 15 seconds. Then mix everything together and add the lime as well.

For the avocado cream, cut avocados in half and scoop out the insides and put into a bowl.  Mash (or use immersion blender) to smooth it out.  Add sour cream (to your taste) and salt, and blend.

To assemble tacos - spread some of the avocado cream on the tortilla, and top with filling.  Garnish with chopped fresh tomato, crumbled queso fresco cheese, cilantro, and hot sauce (to your taste).

Enjoy!

Saturday, July 21, 2012

Mid-Summer Corn Chowder

Corn - a favorite summer food (especially for us Midwesterners!)  It was on sale at our local grocery store, and although we adore corn-on-the-cob, I wanted to try something else with fresh corn and this recipe was just the thing.


This is a great healthy recipe that's perfect for when you have lots of summery produce laying around, just waiting to be eaten.  Unlike most chowders, it doesn't use cream or anything for the smooth texture, so it's waistline-friendly.  It also makes a decent amount, so we had a tasty lunch to bring to work for a few days (always a plus).  I got this recipe from a vegan cookbook (my favorite), but I made it non-vegan with some chicken broth and added cheese.  However, it's easily made vegan/vegetarian and it's superb either way!


In addition to the garnish of tomatoes and basil, I also sprinkled on some queso fresco cheese, and it was even more delicious.  The fiance suggested some small (cubed) roasted rosemary potatoes for a different additional garnish, and I will try that sometime as well.


Mid-Summer Corn Chowder with Basil, Tomato, & Fennel
(adapted from Veganomicon)
Serves 6-8

6 ears fresh corn, husks and silk removed
3 Tbsp olive oil
3 cloves garlic, minced finely
1 large onion, cut into fine dice
1 small bulb fennel (about 1/2 pound), diced
1 stalk celery, chopped finely
1 large carrot, diced
1 pound white, waxy potatoes - Yukon Gold is a good one (about 2 medium-sized), peeled and diced
1 tsp dried thyme (the original recipe called for 2, but thyme can be so pungent so I reduced it to 1)
2 quarts vegetable and/or chicken broth (or a fresh corn stock that I was too lazy to make)
Salt and pepper to taste

Garnish:
1 pound tomatoes, seeded and chopped finely
1/3 cup fresh basil leaves, tightly rolled and chopped into thin strips
Queso fresco or panela cheese, diced/crumbled

On a large cutting surface or in a large bowl, hold an ear of corn by the thicker end and run a sharp knife carefully down the length of the ear, close to the cob, to slice off the kernels of corn.  Repeat with the remaining ears.  Note that kernels will fly all of the place, so have a nice, big work space.  Use the non-sharp side of the knife to 'milk' the cob to get the little bits and juice that you couldn't get while slicing off the kernels.  Set aside the kernels, break each cob in half to use in the corn stock, or add to the soup when simmering.

Preheat a large soup pot over medium-high heat.  Saute the garlic in oil for 30 seconds, then add the onion.  Stir and cover, sweating them for about 5 minutes. Add the carrot and celery, stir, cover, and cook for another 2 minutes.  Add the fennel, stir, cover, and cook for another 2 to 3 minutes; then add the chopped potato, stir, cover, and cook for 5 minutes.

Add the stock, salt, pepper, and thyme, stir, cover, and bring to a boil.  Lower the heat to medium and allow the soup to simmer, covered (with lid tilted so a small amount of heat can escape), for 45 minutes.  Turn off the heat and set aside to cool until only slightly warm.

Puree the bowl of soup with an immersion blender.  If you would like it to be a bit chunkier, reserve half of the soup, un-pureed, in another bowl, and puree only half of it.  Reheat all soup in pot until hot enough to serve, add tomatoes, and basil, and cheese (if using), and serve.

Enjoy!

Sunday, March 11, 2012

Caramelized Onion Veggie Lasagna

First, my apologies on the blog silence!  Work has been (ridiculously) busy, and the boyfriend has now become the fiance (yay!), so there's been little time for fun cooking.  BUT, we do have to eat, after all, so we made this amazing lasagna.


We have made this once before, with a friend, and it was fantastic.  I was bummed that we didn't photograph it for the blog!  Lasagna is a hit in our apartment anyway, but it was nice to try something that wasn't the standard tomato-meat-cheese lasagna.  (Also, we discovered the kitties approved as well - we had to leave for a moment and they were in our plates doing some tasting right away!)


We know I love caramelized onions (need I direct you to the French Onion Soup?)  So that's an automatic win.  But a lasagna with extra veggies, a white sauce, and a spinach-cheese mixture is even better.  We had a bit of produce around the house that needed using up, so I have tweaked the original recipe just a bit to use what we had.  It turned out great.


There are a lot of components to this lasagna, that's for sure.  But it's worth it.  I promise!


Caramelized Onion Veggie Lasagna
(adapted from Eating Well)
8-10 servings

8 ounces lasagna noodles, preferably whole-wheat (or oven-ready, if you're lazy like me!)

Caramelized Onion Filling
3 tablespoons extra-virgin olive oil
3 large sweet onions, thinly sliced (about 10 cups)
8 oz. fresh mushrooms, diced
2 small zucchini, diced
1/2 cup red wine
1 teaspoon salt
Freshly ground pepper, to taste

Spinach & Cheese Filling
4 cups baby spinach
3 cloves garlic, minced
2 cups nonfat ricotta cheese
1/2 cup chopped fresh basil
1/4 cup Parmesan cheese
1/2 teaspoon salt

White Sauce & Topping 
4 tablespoons extra-virgin olive oil
6 tablespoons all-purpose flour
4 cups low-fat milk
1 teaspoon salt
4 ounces crumbled goat cheese (or Gorgonzola, if you like a stronger flavor)
1/4 cup chopped fresh basil
Extra cheese for top 1/2 cup - 1 cup (mozzarella, cheddar, whatever you've got)

If you're using regular lasagna noodles: Bring a large pot of water to a boil. Cook noodles until not quite al dente, about 2 minutes less than the package directions. Drain; return the noodles to the pot and cover with cool water.

To prepare onion filling: Meanwhile, heat 3 tablespoons oil in a large skillet over medium heat. Add onions and cook, stirring frequently, until golden brown and very soft, about 25 minutes. (If they begin to stick, add water 1/4 cup at a time to release them and prevent burning.) Add zucchini and cook for a few minutes.  Then add mushrooms and cook, stirring, until just beginning to soften, about 3 minutes. Add wine and 1 teaspoon salt and continue cooking until most of the liquid is absorbed, 2 to 3 minutes. Remove from heat; stir in pepper.

To prepare spinach filling: Place ingredients in a food processor and process until smooth.

To prepare white sauce: Heat 2 tablespoons oil in a medium saucepan over medium-high heat. Add flour and stir until bubbling, about 30 seconds. Gradually whisk in milk and 1/2 teaspoon salt and bring to a boil, whisking constantly. Cook, whisking, until the sauce has the consistency of thick gravy, about 1 minute. Add goat (or Gorgonzola) and gently whisk until it is melted. Stir in 1/4 cup of freshly chopped basil.  Remove from the heat. (The sauce will continue to thicken as it sits.)

To assemble lasagna: Preheat oven to 375°F. Coat a 9-by-13-inch baking pan with cooking spray.
Drain the noodles and spread out on a kitchen towel. Spread 1/2 cup white sauce in the prepared pan. Place a layer of noodles over the sauce. Spread half of the spinach filling over the noodles and top with one-third of the onion filling. Evenly spread 1/2 cup white sauce over the onions. Repeat with another layer of noodles, the remaining spinach filling, half the remaining onion filling and half the remaining white sauce. To finish, top with a third layer of noodles, spread the remaining onion filling over the noodles and then spread or dollop the remaining white sauce on top. Sprinkle with additional cheese (your choice of variety) to create a bubbly, yummy top.

Bake until hot and bubbling, about 30 minutes. Let rest for 5 minutes before serving.

Enjoy!

Tuesday, January 31, 2012

Black Bean & Sweet Potato Tacos with Swiss Chard Pesto

I know you might be thinking, "That sounds like a weird combination of ingredients."  Stay with me on this, you won't regret it.  You want to try new things, right?  I've made a black bean and sweet potato burrito before, which was good, but this is way better!  Roasting the sweet potatoes is tasty and very appealing to the eye (always a plus).  And the addition of the swiss chard pesto is very unique and adds an interesting flair.

Also, you can adjust the spiciness level to whatever you prefer.  The boyfriend and I differ on this a bit, although we both have a similar Midwestern background.  I'm a wimp.  It's sad.  I try and try to enjoy more spice, but alas, I cannot.  I can't taste anything past the fire.  So I'm the perpetual "1 star/mild" girl at restaurants.  However, the boyfriend's multi-year stint in Colorado has served his taste buds well and he loves medium-hot cuisine.  Yay for him, but it does require some finesse in our shared cooking.

This pesto isn't too terribly spicy, as written.  The swiss chard absorbs a fair amount of any kick, so if you like it spicy, add in more, and taste, taste, taste!


This recipe is also a snap to put together, which is always welcome, of course.  I will admit that the boyfriend was a bit wary (even if he won't say so), and wasn't as excited as I was to try this recipe.  BUT, you can't argue with results, and the result was that we ate it all.


Tasty.  Easy.  Affordable.  Healthy.  Pretty.  It's a... quintuple threat.


Black Bean & Sweet Potato Tacos with Swiss Chard Pesto
(from the Bev Cooks blog)
Makes 4-6 individual tacos, with lots of leftover pesto, so make more potatoes and beans, or freeze the pesto!


Pesto:
1 bunch swiss chard, cut into chunks
1 jalapeno, roughly chopped, seeds removed
3 cloves garlic, roughly chopped
2 Tbsp. green hot sauce

1/2 cup extra-virgin olive oil
Salt & pepper to taste

Sweet Potatoes:
1 Tbsp. extra-virgin olive oil
1 large sweet potato, peeled and cut into a small/medium dice
1 tsp ground cumin
1 tsp chili powder
Salt & pepper

Black Beans:
1 (14.5 oz) can black beans, drained and rinsed
1 tsp cumin
1 tsp chili powder
1/2 tsp garlic salt

8 white corn or flour tortillas
1/3rd cup queso fresco, crumbled
1 avocado, diced
lime and cilantro for garnish

Preheat your oven to 400.

On a rimmed baking sheet toss the diced sweet potato with the oil, 1 tsp chili powder, 1 tsp cumin, a pinch of coarse salt and pepper. Roast for 30 minutes.

In the meantime, toss the swiss chard, jalapeno, garlic, and hot sauce into a food processor. Season with salt and pepper. Start pulsing. With the motor running, pour the oil into the processor in a thin stream, until you have pesto. Taste and adjust seasoning as desired.

Toss the beans into a small sauce pan and season with the remaining cumin, chili powder and garlic salt. Heat through, 5 minutes.

On a small grill or skillet, warm the tortillas.

Assemble: tortilla, sweet potatoes, beans. Dollop with a good 2 Tbs. of swiss chard pesto. Sprinkle on the diced avocado, queso fresco, a good spritz of lime and a few cilantro leaves.

Enjoy!

Sunday, January 29, 2012

Whole Wheat Biscuits (Vegan)

I love biscuits.  This is a well known fact.  I would love to share biscuits with all my friends, however, some of them are vegan.  Hm.  This presents a problem.  How to make them without my beloved dairy?  And lard??  And no weird flours or ingredients that I'd have to get at a special store?

Enter: Coconut oil (non hydrogenated)


For those of you who haven't cooked with it before, it's great.  It's generally found in the organic area of the grocery store, and it's fantastic for cooking up to medium-high heat.  It's a mildly flavored (no suntan lotion smell, I promise!) and it's great for baking.  I also particularly enjoy using a bit of it for cooking eggs or some stir fries.  

To note though, that all coconut oils are not created equal.  I used Dr. Bronner's (yes, the same manufacturer as the hemp peppermint-all-in-one pure castile soap!) for this recipe, and it did smell coconut-y, but not in a bad way.  I do know that Spectrum brand is odorless, so next time I'll probably use it instead.  Also, it does melt at a lower temperature, so I knew that keeping it "in chunks" for biscuits would be tough.  Thankfully, we just acquired a food processor, and that does the trick for cutting in the fat without making a melted, soggy mess.  So the question -  can coconut oil replace butter and lard in a biscuit where it's crucial to have chunks of fat to create steam pockets and therefore flaky biscuits?

Apparently, yes.

But first, another dairy dilemma - what about the buttermilk?  A friend suggested almond milk.  To recreate the tang that buttermilk has, I soured it with lemon juice.  And, bingo, it worked.  And it didn't taste of almonds, which wouldn't have necessarily been a bad thing, but not what I was going for.

I will admit that I wasn't sure these were going to work, so I didn't photograph the process (oops).  Work they did, and the flavor was great!  The whole wheat flour lent a nutty and more wholesome flavor, and they were flaky and tender, as all biscuits aspire to be.

And they are boyfriend and vegan friend approved!


(If you're going for just "regular whole wheat biscuits," you can still use this recipe.  Just swap out the coconut oil and almond milk for butter and milk)

Vegan Whole-Wheat Biscuits
(heavily adapted from the Cook's Country recipe)
Makes ~ 12 biscuits

12 Tbsp coconut oil (scoop out, and put in a bowl in the fridge until you need it - remember, it needs to be cold!)
2 cups all-purpose flour
1 cup whole wheat flour
1 Tbsp sugar
1 Tbsp baking powder
1 tsp salt
1/2 tsp baking soda
1 1/4 cups almond milk (with 1 Tbsp + 3/4 tsp lemon juice)

Preheat the oven to 450 degrees, and line a baking sheet with parchment paper.

Mix dry ingredients in your food processor, a few pulses will do it.  Scatter the coconut oil chunks (cold) over the dry ingredients and pulse briefly, until it resembles a coarse meal.

Dump the mixture into a bowl and stir in the almond milk mixture by hand.  Stop when the dough forms a uniform texture.  (The food processor will overwork it and produce tough biscuits.  Tough biscuits = all the bad things in the world!)

Turn the dough out onto a lightly floured surface and knead gently.  Roll it out evenly, until it's about 3/4 inch thick.  Dip a floured biscuit (or cookie) cutter into flour before cutting out the biscuits.  Place them onto the prepared pan.

Bake the biscuits for 5 minutes in the 450 degree oven, and then rotate the pan and turn the oven down to 400 degrees.  Bake for 10-12 more minutes.  Transfer to a wire rack, let cool a few minutes, and then enjoy!

Wednesday, January 4, 2012

Quinoa Veggie Loaf

A fresh, new year means it's time for resolutions!  We all aim to be healthier, right?  (Or at least try to cut down the sweets consumption, however briefly)  Well, if you're looking for a healthy, easy, affordable recipe to add to your repertoire, I've got just the thing for you - a Quinoa Veggie Loaf!  My version is vegetarian, but could easily be made vegan.  (I'm from the Midwest, so cheese is an entire food group for us)  :-)


To start, some of you may not be familiar with the amazing grain - quinoa.  Hailing from South America, and gaining popularity as a "superfood," it's a wonderful grain to add to your diet.  Low-fat, high in fiber, high in protein (unusual for a grain), gluten-free, and easy to cook - what's not to love?  There are many colors, and it has a nutty flavor and a texture that's sort of like cross between barley and couscous.  It works well in many applications such as a pilaf, veggie burger, or breakfast cereal - with many more possibilities.  If you're intimidated by the preparation of it, don't be!  This website will show you the way to make it perfectly every time!


Growing up in the Midwest, wheat and corn were the grains I knew.  (Anything else might have thought of as hippie food)  On a recent trip home I introduced quinoa to my family and had fun taking my dad down the "natural foods" aisle for the first time.  I was afraid they would be tough critics, but they loved the quinoa dish I made for them.  So if you haven't yet tried quinoa - give it a shot.  It's tasty, economical, healthy, and boyfriend-approved - jackpot!

Quinoa Veggie Loaf
(adapted from Whole Foods)
Makes 6-8 servings

1 tablespoon extra virgin olive oil, plus more for greasing
8 ounces button mushrooms, sliced
Salt and ground black pepper to taste
1 (15-ounce) can  garbanzo beans, rinsed and drained
3/4 cup rolled oats
2 cups cooked quinoa (How to Cook Quinoa Perfectly)
1 cup frozen green peas
1/2 cup chopped fresh parsley and/or 1 tablespoon minced fresh thyme
10 sun dried tomatoes packed in oil, drained and chopped
1 cup (about 1 onion) chopped red onion
1/4 cup cheese of choice (cheddar is a good choice, but basically something you want to see golden brown and bubbling)
1-2 cloves of garlic, minced
Salt and pepper to taste
4 kale leaves - stems removed, chopped, and sauteed (optional)


Preheat oven to 350°F. Lightly grease an 8-inch loaf pan with oil; set aside. Heat oil in a large skillet over medium-high heat. Add garlic, and cook until fragrant (30 seconds).  Add onions, and cook until soft.  Add mushrooms, salt and pepper and cook, stirring occasionally, until mushrooms are golden brown, 6 to 8 minutes.  Add chopped kale and wilt.

Meanwhile, put beans, oats and 1/2 cup water into a food processor and pulse until almost smooth. (This mixture is the "binder" in this recipe)  In a large bowl, combine bean mixture, quinoa, salt and pepper and all other ingredients except cheese. Transfer mixture to prepared loaf pan, gently pressing down and mounding it in the middle. Sprinkle cheese on top of loaf.  Bake until firm and golden brown, 1 to 1 1/4 hours. Set aside to let rest for 10 minutes before slicing and serving.

Enjoy!